BenchmarkXPRT Blog banner

Month: September 2019

An update on AIXPRT development

It’s been a while since we last discussed the AIXPRT Community Preview 3 (CP3) release schedule, so we want to let everyone know where things stand. Testing for CP3 has taken longer than we predicted, but we believe we’re nearly ready for the release.

Testers can expect three significant changes in AIXPRT CP3. First, we updated support for the Ubuntu test packages. During the initial development phase of AIXPRT, Ubuntu version 16.04 LTS (Long Term Support) was the most current LTS version, but version 18.04 is now available.

Second, we have added TensorRT test packages for Windows and Ubuntu. Previously, AIXPRT testers could test only the TensorFlow variant of TensorRT. Now, they can use TensorRT to test systems with NVIDIA GPUs.

Third, we have added the Wide and Deep recommender system workload with the MXNet toolkit. Recommender systems are AI-based information-filtering tools that learn from end user input and behavior patterns and try to present them with optimized outputs that suit their needs and preferences. If you’ve used Netflix, YouTube, or Amazon accounts, you’ve encountered recommender systems that learn from your behavior.

Currently, the recommender system workload in AIXPRT CP3 is available for Ubuntu testing, but not for Windows. Recommender system inference workloads typically run on datacenter hardware, which tends to be Linux based. If enough community members are interested in running the MXNet/Wide and Deep test package on Windows, we can investigate what that would entail. If you’d like to see that option, please let us know.

As always, if you have any questions about the AIXPRT development process, feel free to ask!

Justin

An updated HDXPRT 4 v1.1 installer package

Today, we published an updated HDXPRT 4 v1.1 installer package that addresses an issue brought to light by HDXPRT testers and our own follow-up testing. We’ve also encountered an issue caused by anti-virus program interference during the HDXPRT installation process, so we’re providing steps for a workaround below. Neither the updated build nor the workaround steps affect the comparability of previous HDXPRT 4 test scores.

The first issue involves the hdxprt4.exe setup file. You may recall that the main updates in HDXPRT 4 v1.1 were the inclusion of the latest version of HandBrake and the ability for testers to choose whether to target a system’s discrete graphics card during the Convert Videos workload. Prior to today’s update, the HDXPRT 4 v1.1 installation package mistakenly included an old hdxprt4.exe setup file, which likely caused problems for testers attempting to target discrete graphics. We apologize for this oversight. The installer package we published today includes the correct hdxprt4.exe setup file.

The second issue is that during the installation process, Windows Security and other anti-virus programs may quarantine some of the AutoIt executables that HDXPRT 4 uses to install real-world applications, and the incomplete installation process will cause the test to fail. The files do not contain viruses, but the anti-virus programs may assume that the user has not granted HDXPRT permission to install the ancillary files. One of the executables currently triggering this behavior is the MediaEspresso ME75_2x4K_transcode.exe file. To check whether your test system is quarantining this file, navigate to the C:\Program Files (x86)\HDXPRT4\HDXPRT4_Workloads\HDXPRT4_Tests folder. Once the installation process is complete, the folder should contain 32 files, including ME75_2x4K_transcode.exe. If you see all 32 files, you’re ready to test. (Note: Once you run the test, HDXPRT 4 will add HDXPRTRunLog.txt to the folder, so you might see 33 files.)

If you see only 31 files, ME75_2x4K_transcode.exe is likely missing. To restore it, use the following steps:

1. Open the Windows Security app.
2. Select Virus & threat protection.
3. Under Current threats, select Protection history.
4. Check to see if Windows Security removed any threats around the time you installed HDXPRT 4.
5. If so, click the drop-down menu on the right side, where Windows Security lists the severity of the threat, and look for a false positive that reports the ME75_2x4K_transcode.exe file as Trojan:Win32/Wacatac.B!ml.
6. Click the Actions drop-down menu, and select Restore.
7. Navigate to the C:\Program Files (x86)\HDXPRT4\HDXPRT4_Workloads\HDXPRT4_Tests folder, and check to see where the ME75_2x4K_transcode.exe file is present.

Windows Security and other anti-virus programs may quarantine other HDXPRT installation files in the future. If your first HDXPRT 4 run fails to complete successfully, we suggest checking the anti-virus quarantine for HDXPRT-related files.

We also updated the HDXPRT 4 User Manual to include the steps above. If you have any questions about any of these topics, please feel free to contact us.

Justin

Understanding concurrent instances in AIXPRT

Over the past few weeks, we’ve discussed several of the key configuration variables in AIXPRT, such as batch size and level of precision. Today, we’re discussing another key variable: number of concurrent instances. In the context of machine learning inference, this refers to how many instances of the network model (ResNet-50, SSD-MobileNet, etc.) the benchmark runs simultaneously.

By default, the toolkits in AIXPRT run one instance at a time and distribute the compute load according to the characteristics of the CPU or GPU under test, as well as any relevant optimizations or accelerators in the toolkit’s reference library. By setting the number of concurrent instances to a number greater than one, a tester can use multiple CPUs or GPUs to run multiple instances of a model at the same time, usually to increase throughput.

With multiple concurrent instances, a tester can leverage additional compute resources to potentially achieve higher throughput without sacrificing latency goals.

In the current version of AIXPRT, testers can run multiple concurrent instances in the OpenVINO, TensorFlow, and TensorRT toolkits. When AIXPRT Community Preview 3 becomes available, this option will extend to the MXNet toolkit. OpenVINO and TensorRT automatically allocate hardware for each instance and don’t let users make manual adjustments. TensorFlow and MXNet require users to manually bind instances to specific hardware. (Manual hardware allocation for multiple instances is more complicated than we can cover today, so we may devote a future blog entry to that topic.)

Setting the number of concurrent instances in AIXPRT

The screenshot below shows part of a sample config file (the same one we used when we discussed batch size and precision). The value in the “concurrent instances” row indicates how many concurrent instances will be operating during the test. In this example, the number is one. To change that value, a tester simply replaces it with the desired number and saves the changes.

Config_snip

If you have any questions or comments (about concurrent instances or anything else), please feel free to contact us.

Justin

Understanding the basics of AIXPRT precision settings

A few weeks ago, we discussed one of AIXPRT’s key configuration variables, batch size. Today, we’re discussing another key variable: the level of precision. In the context of machine learning (ML) inference, the level of precision refers to the computer number format (FP32, FP16, or INT8) representing the weights (parameters) a network model uses when performing the calculations necessary for inference tasks.

Higher levels of precision for inference tasks help decrease the number of false positives and false negatives, but they can increase the amount of time, memory bandwidth, and computational power necessary to achieve accurate results. Lower levels of precision typically (but not always) enable the model to process inputs more quickly while using less memory and processing power, but they can allow a degree of inaccuracy that is unacceptable for certain real-world applications.

For example, a high level of precision may be appropriate for computer vision applications in the medical field, where the benefits of hyper-accurate object detection and classification far outweigh the benefit of saving a few milliseconds. On the other hand, a low level of precision may work well for vision-based sensors in the security industry, where alert time is critical and monitors simply need to know if an animal or a human triggered a motion-activated camera.

FP32, FP16, and INT8

In AIXPRT, we can instruct the network models to use FP32, FP16, or INT8 levels of precision:

  • FP32 refers to single-precision (32-bit) floating point format, a number format that can represent an enormous range of values with a high degree of mathematical precision. Most CPUs and GPUs handle 32-bit floating point operations very efficiently, and many programs that use neural networks, including AIXPRT, use FP32 precision by default.
  • FP16 refers to half-precision (16-bit) floating point format, a number format that uses half the number of bits as FP32 to represent a model’s parameters. FP16 is a lower level of precision than FP32, but it still provides a great enough numerical range to successfully perform many inference tasks. FP16 often requires less time than FP32, and uses less memory.
  • INT8 refers to the 8-bit integer data type. INT8 data is better suited for certain types of calculations than floating point data, but it has a relatively small numeric range compared to FP16 or FP32. Depending on the model, INT8 precision can significantly improve latency and throughput, but there may be a loss of accuracy. INT8 precision does not always trade accuracy for speed, however. Researchers have shown that a process called quantization (i.e., approximating continuous values with discrete counterparts) can enable some networks, such as ResNet-50, to run INT8 precision without any significant loss of accuracy.

Configuring precision in AIXPRT

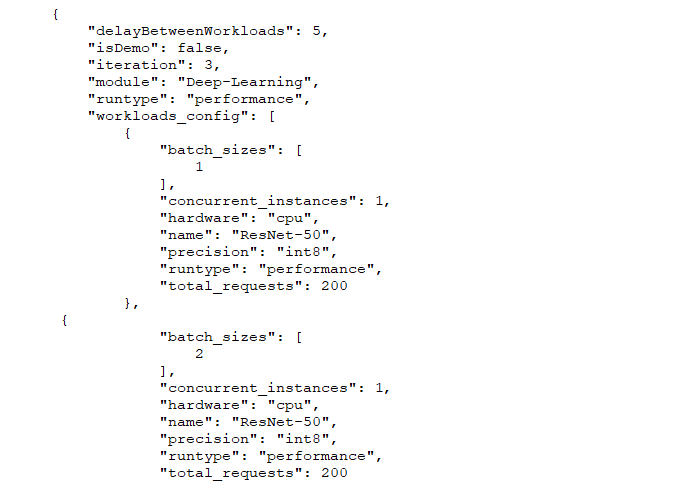
The screenshot below shows part of a sample config file, the same sample file we used for our batch size discussion. The value in the “precision” row indicates the precision setting. This test configuration would run tests using INT8. To change the precision, a tester simply replaces that value with “fp32” or “fp16” and saves the changes.

Config_snip

Note that while decreasing the precision from FP32 to FP16 or INT8 often results in larger throughput numbers and faster inference speeds overall, this is not always the case. Many other factors can affect ML performance, including (but not limited to) the complexity of the model, the presence of specific ML optimizations for the hardware under test, and any inherent limitations of the target CPU or GPU.

As with most AI-related topics, the details of model precision are extremely complex, and it’s a hot topic in cutting edge AI research. You don’t have to be an expert, however, to understand how changing the level of precision can affect AIXPRT test results. We hope that today’s discussion helped to make the basics of precision a little clearer. If you have any questions or comments, please feel free to contact us.

Justin

Check out the other XPRTs:

Forgot your password?