A Principled Technologies report: Hands-on testing. Real-world results.
Managing VLANs from advanced partitioned NICs: Dell PowerEdge MX760c servers with Broadcom 57504 Quad-Port 25GbE Mezzanine Adapter using Advanced NPAR
We found this combination of hardware and features to be an excellent solution for network administrators managing multiple virtualized networks
Overview
Modern datacenters face multiple design challenges, and one of the biggest is in physical network design. Their logical layout and physical topology allow network architects to connect applications, services, and microservices. Virtualization and increasing adoption of cloud computing technologies, along with the explosive proliferation of data, has further compounded the challenges these architects face.
Virtualization in particular presents one of the most important challenges. With network virtualization, architects can divide their networks into meaningful segments that group similar services and applications together. Such designs can increase efficiency by limiting network congestion and helping to secure traffic. Each application or microservice likely resides on or is connected to virtual machines or containers, which also use virtual networking technologies. At each layer of application and datacenter design, the logical separation of networking services via virtualization is critical.
Advanced Network Partitioning (NPAR) is a switch-dependent NIC partitioning technology from Dell™ and Broadcom® that can help organizations address some of these logical and physical networking management issues by giving them greater control over ports, partitions, and VLANs. With prior versions of NPAR, administrators could partition a NIC, but any VLAN assignment would be the same on all partitions of that network port. With Advanced NPAR, administrators using Fabric Manager can now assign VLANs to each partition, and the switch is made aware of those VLAN assignments.
A few key terms and concepts
Organizations commonly employ network designs that require multiple separate networks for normal network traffic for applications, storage, management, and virtual machine (VM) portability (e.g., VMware vMotion®). For many years, companies have had the ability to segment their networking traffic using VLANs and NPAR. Understanding each of these technologies—and how you can successfully pair them—is vital if you want to create the best network design for your organization. Table 1 defines a few key networking concepts and terms vital to this discussion.
Table 1: Definitions of important terms and concepts.
Concept
Description and common use cases
VLAN
Virtual local area network: A virtual overlay onto a physical network that allows a collection of devices to communicate as if they were on a single isolated network. VLANs can help to manage network load, because devices on one VLAN are logically separate from those on another. VLANs are logical, and thus administrators can group or define them based on function (e.g., storage, vMotion, management) or line of business (e.g., marketing, sales, HR).
NPAR
Network partitioning: Using NPAR, an admin can present multiple NICs to an operating system (OS) from a single physical network interface card (NIC) as if each were a separate physical NIC. For example, an admin could divide a single 25Gb NIC using NPAR into say, four partitions, each of which appears as a separate physical NIC to the operating system.
Advanced NPAR
Advanced NPAR is networking partitioning feature that logically partitions both the mezzanine card ports and the switch ports on the Dell PowerEdge MX7000 chassis, specifically the Dell MX9116n Fabric Switching Engine we used in our tests. Administrators can assign VLANs to each partition with Advanced NPAR and have the switch be made automatically aware of those VLAN assignments. In prior generations of NPAR, users could assign just a single VLAN to all partitions on the entire NIC. The Advanced NPAR feature is supported on the MX9116n Fabric Switching Engine, MX5108n switch, and the MX7116n Fabric Expander Module (FEM) when used in conjunction with the MX9116n (note we did not use a FEM in this study). The Advanced NPAR feature is supported on the Broadcom 57504 NIC and VMware ESXi 7.0.U3 and above as the server host operating system.
Fabric
In a networking context, fabric refers to the collection of networking media and devices, such as NICs, switches, and cabling, that communicate with each other. Dell SmartFabric™, which we discuss in more detail below, allows admins to manage these components from a single interface.
Why VLAN and NPAR management matters
As network architects take advantage of virtualization capabilities to build these complex networks, VLANs proliferate. More VLANs can, of course, turn into a problem, because they represent more network features to manage. Thus, the careful management of VLANs is key to network success.
Many datacenters use vSphere® deployments, and many are in converged architectures, running multiple types of networking services over a single physical medium (e.g., NIC, cable, switch). In vSphere, you can assign VLANs in the VM’s guest OS, on a vSwitch®, or at the physical switch (fabric level), either in the chassis or external to it. VLANs you create at the fabric level bring some advantages, because network administrators can manage the network with consistency, and special-purpose network hardware is historically faster than software switches. Because of the complexity of networking in regards to service and application design, and the converged networking configuration of many vSphere deployments, a well-designed hardware and VLAN management solution is critical.
Coupled with VLAN management, the use of NPAR can be a powerful asset as well, giving an administrator the ability to partition a NIC into multiple NICs that appear separately to the OS. However, with NPAR, administrators have been historically constrained to a single VLAN assignment on the entirety of the physical port. Put differently, if an administrator used NPAR to partition a single physical NIC into four independent devices to present to the OS, all VLAN assignments made at the switch would be applied identically across all partitions on that NIC port. With Advanced NPAR, however, the switch is made aware of the configuration and the NPAR configuration is both server side and switch side. This allows administrators to configure differing VLANs across multiple NPARs on a single NIC.
A Dell and Broadcom solution
To address these challenges, network architects need systems with as much flexibility, performance, and bandwidth from each port as possible; otherwise, physical cabling and port management becomes difficult. When you use network separation techniques such as VLANs and NPAR, it’s also vital that the management of those VLANs and NPAR configurations is as streamlined and easy to use as possible.
Dell and Broadcom provide a solution for these challenges in the Dell PowerEdge™ MX760c compute sled with the Broadcom 57504 Quad Port 25GbE Blade Mezzanine Card.
We tested VLAN and Advanced NPAR functionality using VMware vSphere on a new Dell PowerEdge MX Broadcom solution that let us create VLANs on NICs we partitioned with an updated Advanced NPAR feature. This approach adds more network ports to the vSphere environment, allowing more opportunity to segregate traffic, and moves some of the VLAN switching from vSphere software to the NIC’s hardware. Administrators implementing Advanced NPAR using this solution can choose between two modes: Full Switch mode, which requires traditional configuration of each switch, and SmartFabric mode, which streamlines admin tasks by unifying switch management through the OME-M console. We found that network administrators can connect services by creating VLANs either through a web-based OpenManage Enterprise console, which also provides automation capabilities, or through a direct command line interface.
Benefits of the Dell and Broadcom Advanced NPAR solution
Often, enabling a new technology in your infrastructure comes at a cost. Either the technology requires significant training, other tangentially related features may not function as you expect, or the technology may fall outside the scope of the tools you use to manage your infrastructure. Fortunately, this is not the case with Advanced NPAR. In fact, using Advanced NPAR has the following benefits:
Because dedicated NICs typically route management traffic, Advanced NPAR changes do not affect iDRAC and other management traffic.
Dell helps to simplify and automate Advanced NPAR configuration by integrating the process within the server profile template. Once IT enables Advanced NPAR in a template, they can reuse that template to make future configurations use the technology.
The Link Layer Discovery Protocol (LLDP), a protocol running at layer 2 of the OSI model, continues to function with Advanced NPAR. IT teams often use LLDP for network discovery and network monitoring. Dell recommends leaving LLDP enabled.1
Advanced NPAR does not require any proprietary discovery protocols, such as is necessary with Cisco Discovery Protocol (CDP), thus removing any vendor-specific concerns.
Advanced NPAR settings appear within the familiar configuration screens of the Dell PowerEdge Unified Extensible Firmware Interface (UEFI), an interface between the OS and firmware, and are also accessible within OME-M.
Advanced NPAR leverages the advanced packet processing and classification capabilities of the Broadcom NIC, making the implementation transparent to the host OS and applications.
Minimizing implementation of physical NICs with Advanced NPAR on PowerEdge MX
As we discussed earlier, NPAR lets you split a physical network adapter into multiple network adapters; in this case, you can create up to four virtual ports per physical interface. Each virtual port receives its own MAC address and can receive its own VLAN ID.2 Additionally, you can set each virtual port’s bandwidth allocation, and in some cases, its QoS policies as well. These abilities let you better manage network resources.3
You must enable NPAR at the firmware level of the server’s network adapter. NPAR also requires support from both the adapter and the operating system running on the server. You must ensure that all components are supported in order to configure Advanced NPAR. The Broadcom 57504 quad-port 25GbE adapter is supported, along with a number of server and switch options.4 Once you’ve correctly configured the network adapter, you use software from the server vendor for further customization. Dell offers two options. Within Dell Lifecycle Controller, you can define the ports and set their bandwidth allocation. More rich and robust features, including the ability to fully utilize the new Advanced NPAR feature,5 are available within the Dell OME Modular console. Though historically you had to manage VLAN tagging at the OS level if the OS supported that ability, now you can use OME Modular to handle all the NPAR configuration tasks.
The typical use case for NPAR is in datacenters that require high performance and network reliability. By dividing physical network adapters, NPAR allows for multiple applications running on the same hardware as well ensuring each application has the correct network resources available. Additionally, the reduction in physical adapters and physical connections can reduce network sprawl and cut down on the need for additional physical switches and cables. Not only are networking resources optimized, but CPU utilization improves as well by offloading this virtualization from the OS to the NIC.6
Depiction of Advanced NPAR functionality using the Dell PowerEdge MX and Broadcom 57504. NPAR partitions add VLAN tags on upstream traffic.
The benefits of using SmartFabric mode
Enabling SmartFabric mode for Dell PowerEdge MX solutions simplifies administrator tasks for networking configuration, monitoring, and management by providing a unified console for easy switch configuration. Rather than having to individually manage physical switches in each chassis, administrators can use Dell OME-M to manage everything. This includes tagging ports and servers with specific VLANs.
By unifying these tasks and giving administrators the ability to complete them from a single console, SmartFabric mode saves administrators from typing many commands in the CLI or developing complex scripted solutions, saving significant effort and reducing the chance of errors in switch configuration. Some of the commands that administrators may run without SmartFabric include ones that configure spanning tree, VLANs, mtu, switchport mode, negotiation, duplex, port channel, and partitioning at both the individual port and global levels.
Dell offers SmartFabric Services (SFS) technology to complete this underlying network automation/orchestration, which streamlines these administrator tasks. Dell defines SmartFabric as “a logical entity that consists of a collection of physical resources, such as servers and switches, and logical resources such as networks, templates, and uplinks. The OpenManage Enterprise - Modular console provides a method to manage these resources as a single unit.”7
The benefits of using Full Switch mode
While the benefits of SmartFabric are clear, some use cases may require the control and fine grain of using Full Switch mode. By default, Dell PowerEdge MX solutions use Full Switch mode.
Some organizations may prefer to use this traditional approach to switch and chassis management, where administrators must configure each switch via the command line interface (CLI) instead of through the Dell OME-M GUI that can connect multiple chassis. Administrators may choose Full Switch mode due to personal preference, or because of some of the following differences in operating modes. In Full Switch mode:
“Configuration changes are persistent during power cycle events
All switch interfaces are assigned to VLAN 1 by default and are in the same Layer 2 bridge domain
All configuration changes are saved in the running configuration by default”8
According to documentation from Dell, “When operating in Full Switch Mode, the switch can perform any functionality supported by the version of OS10 running on the switch.”9 Using Full Switch mode still allows for Scalable Fabric that spans up to 10 MX chassis; it simply means that administrators must configure each switch to match each server chassis to do so.
Testing the functionality of Advanced NPAR
We set out to explore the capabilities of the Advanced NPAR feature on the Dell PowerEdge MX chassis and how well the Dell OpenManage Enterprise Modular tool supported it. In this section, we include the details on the hardware we used and a high-level overview of our test process, and then we drill down into the detailed steps we took.
Hardware: Testing Advanced NPAR on Dell PowerEdge MX with Broadcom NICs
For testing, we used a Dell PowerEdge MX chassis with three servers, a Dell MX9116n Fabric Switching Engine, and Broadcom Adv Quad 25Gb Ethernet NIC.
Our firmware levels were as follows:
Table 2: Components and their firmware or software versions.
To see all the details of the hardware and software we used for testing, visit the science behind the report.
Overview: Testing Advanced NPAR on Dell PowerEdge MX with Broadcom NICs
We tested Advanced NPAR on the Dell PowerEdge MX with Broadcom NICs using both SmartFabric mode and Full Switch mode, to verify that whichever mode an administrator prefers can provide Advanced NPAR functionality. Setting up SmartFabric mode through the Dell OME-GUI was simple and straightforward: we created a new Fabric, selected the appropriate uplinks, and set our tagged and untagged VLANs. We also tested Full Switch mode, which relies on manual configuration via CLI similar to physical switches, to show that both modes worked with OME-M Advanced NPAR.
To use the Advanced NPAR feature, one must first update NIC firmware and enable Advance NPAR at the device level within Lifecycle Controller before completing configuration steps within OME-M. (Note: In our testing, we created our new profile from an existing device, selecting a server that had Advanced NPAR enabled.) We imported the Advanced NPAR-enabled profile, edited it, and then accessed the networking portion of the profile. From the Networking section, we configured NPAR, tagged and untagged VLANs as appropriate, and set network bandwidth allocation. Then, we were able to deploy this profile to other servers in our network.
You should first enable Advanced NPAR from within the UEFI boot menu, a straightforward task:
Enable Advanced NPAR within UEFI. In the device-level configuration, enable Advanced NPAR for two partitions per port, and optionally NPAREP mode for four partitions per port.
In OME-M, create a template on the server with Advanced NPAR enabled.
In OME-M, apply a profile to that same server based on that template.
In OME-M, adjust VLANs on the NPAR setup that appeared.
From there, administrators can reuse that server profile over and over again.
To ensure that the Advanced NPAR feature was working on our Dell PowerEdge MX solution, we accessed the ESXi 7.0 management page where we could see that NPAR was functioning and VLAN tagging worked correctly. Typically, admins would tag the management network with the correct VLAN within ESXi, but the ability to deploy a template meant we could access them immediately. Additionally, we ran ping tests to ensure these servers were reachable across the network.
During our deployment, we also we checked how long it took before the profile changes took effect. To do this, we returned to the profile, dropped the management VLAN, and lost access to the server management page to the server almost instantly, proving that change propagation was almost instant.
Below, we show in more detail how to configure Advanced NPAR on a Dell PowerEdge MX solution.
Testing Advanced NPAR on Dell PowerEdge MX with Broadcom 57504 NICs
The configuration process for Advanced NPAR on the Dell PowerEdge MX requires three broad steps:
Phase 1: Enable Advanced NPAR in device settings, and verify that it is enabled.
Phase 2: Create an uplink to add the fabric.
Phase 3: Create a template from the server with Advanced NPAR enabled, and modify it to assign VLANs.
Phase 1: Enabling Advanced NPAR in device settings
First, log into the OME Modular console. Navigate to the server whose profile you want to use as a template. Launch the Virtual Console and boot into Lifecycle Controller, rebooting the server before continuing.
To configure a NIC port for NPAR in Lifecycle Controller, navigate to Device Settings. Select the NIC Port you want to configure (we chose Port 1), and select Device Level Configuration. To use the Advanced NPAR features, select Advanced NPAR from the Virtualization Mode drop-down and enable NPAREP Mode, which allows virtualization of four ports. (See Figure 2.)
Enabling Advanced NPAR in the Lifecycle Controller console.
After completing the process, continue configuring NIC Partitioning. Ensure that NIC+RDMA is set to Disabled before following the on-screen prompts to finish configuration and exit the console. (See Figure 3).
Configuring NIC Partitioning parameters in the Lifecycle Controller console.
You can verify that you have correctly enabled Advanced NPAR in multiple ways:
In device settings, ensure that Advanced NPAR is configurable and editable for some basic settings.
In iDRAC, each port is now split into several different partitions where they were not before the settings changed.
ESXi shows an increase in the number of available Network Adapters.
The OME-M device Port Information page that shows the added partitions for the Ethernet ports.
Looking at the number of network adapters available in ESXi to confirm that Advanced NPAR is enabled.
Phase 2: Creating an uplink to add the fabric
Once Advanced NPAR is enabled, you must ensure that the MX fabric is properly configured and has an uplink. From the OME-M console, navigate to the fabric that you want to configure and add an uplink, giving it an appropriate name and description. For our test purposes, we selected Ethernet - No Spanning Tree as the uplink type. (See Figure 5.)
Adding a fabric uplink in OME-M.
Select the switch for which you want to create an uplink as well as the appropriate switch ports. In our tests, we selected the VLANs for use in Advanced NPAR, leaving VLAN 1 untagged (see Figure 6).
Tagging the appropriate switches and ports for the fabric uplink.
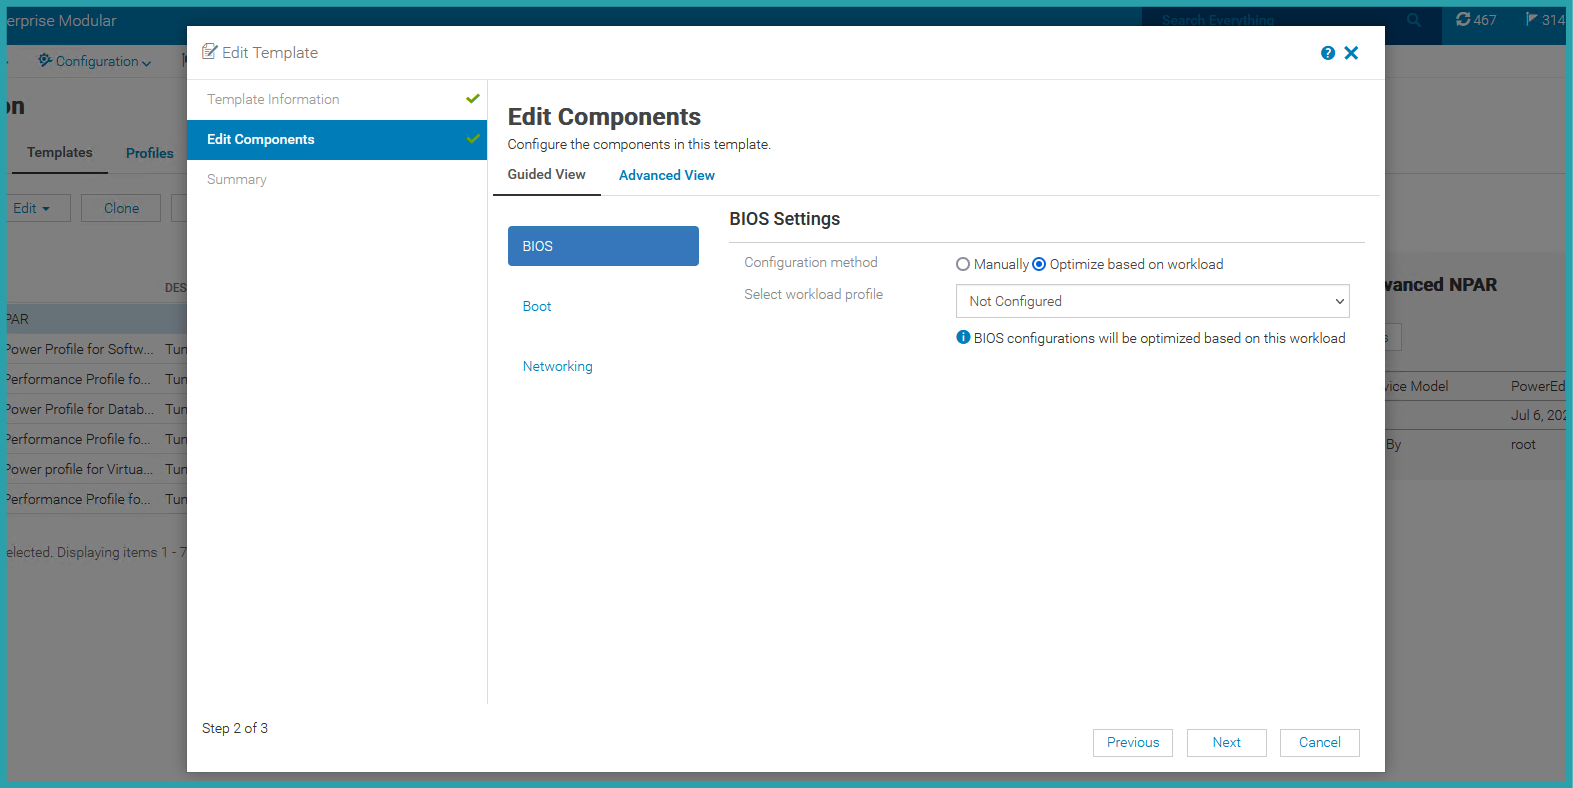
Phase 3: Creating a server profile template
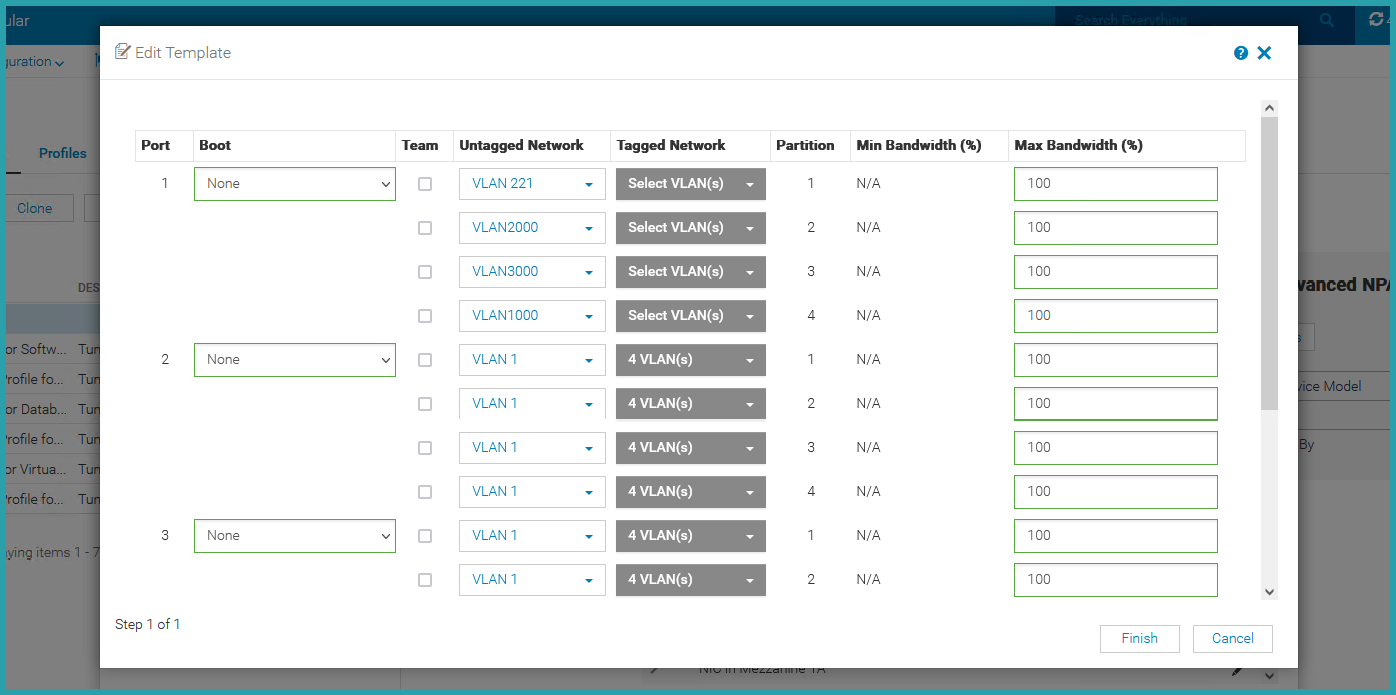
To assign VLANs to the created ports, navigate to Templates, and create a new template. (Note: We used a template from a reference server previously configured with advanced NPAR.) Edit the template and assign VLANs to match the configuration you desire (see Figure 7).
Editing a template in OME-M.
From the Edit Components tab (see Figure 8), click Networking to select the ports, and label VLANs as tagged or untagged as appropriate (see Figure 9).
The Edit Components screen in the Edit Template menu.
Assigning VLANs as tagged or untagged in the Edit Template menu.
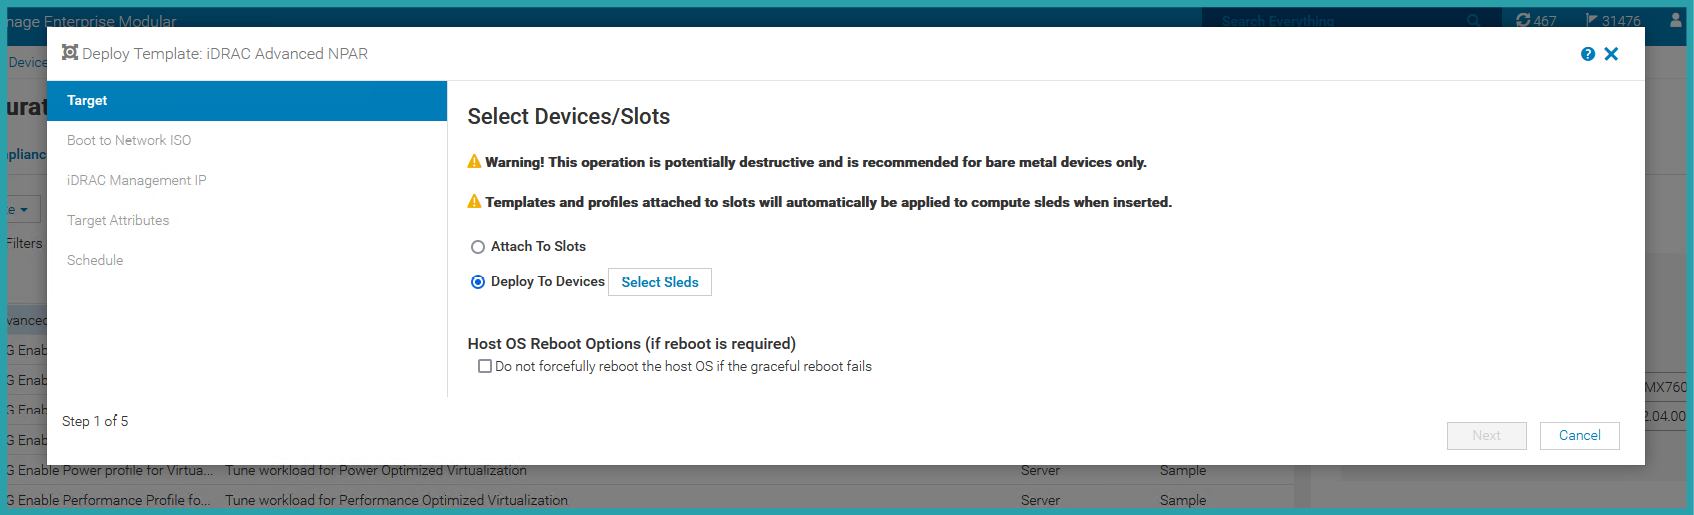
Now that the template is created, you can assign it to other PowerEdge servers by choosing Deploy Template on the Template screen. Here, you can select Deploy to Devices [Select Sleds] to choose the server sleds you want to deploy the template to (see Figure 10).
Selecting the server sleds to deploy a template to.
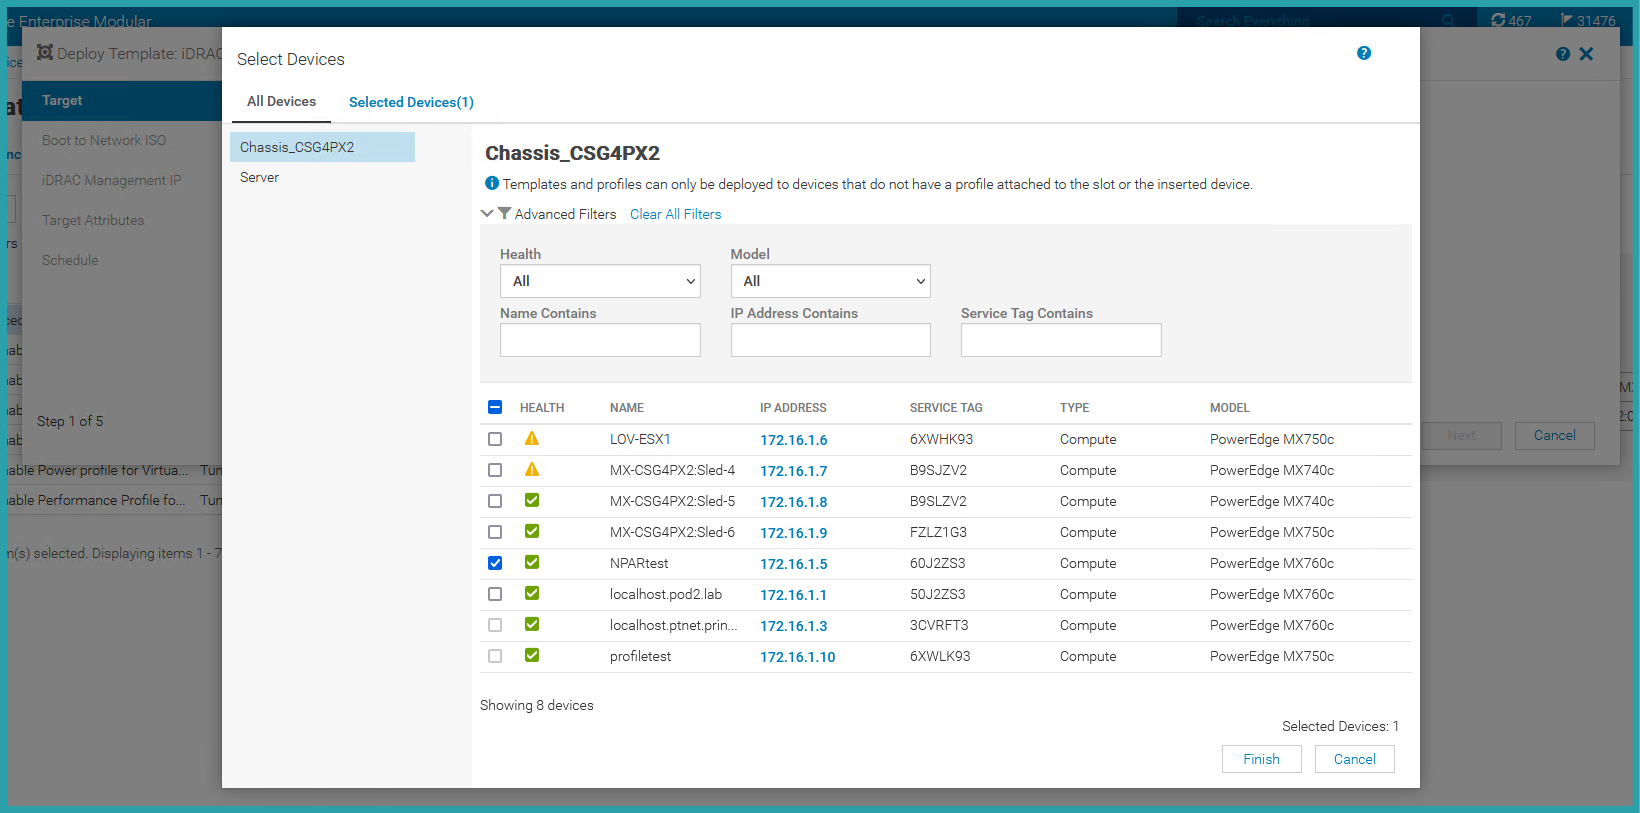
For our test purposes, we selected all the server sleds that had we enabled for Advanced NPAR, and deployed the created template to them (Figure 11).
Selecting servers for template deployment.
About the Dell and Broadcom solution
About Dell OpenManage Enterprise Modular
According to Dell, OpenManage Enterprise Modular Edition “enables comprehensive management for PowerEdge MX from a single web or API interface console managing compute, storage and networks simply, with no extra software to install.”10
Its unified interface approach offers access to all servers, storage, and networking from one IP address, lets users manage up to 20 MX chassis from a single console, and supports enabling and configuring all components with zero-click discovery.11
According to Dell, the new PowerEdge MX760c server is a “2-socket, single-width sled with scalable and dense compute for AI inferencing, database, Big Data analytics, virtualization, and containerization.”12
About the Broadcom 57504 Quad Port 25GbE Blade Mezzanine Card from Dell
According to Dell, the Broadcom 57504 Quad Port 25GbE Blade Mezzanine Card from Dell features a compact space-saving design and is ideally suited to high-performance network applications.13 Dell has tested and validated the card on Dell systems and Dell Technical Support provides support for the card when customers use it with a Dell system.14 In addition to the PowerEdge MX760C we used in testing, the card is compatible with the following servers: PowerEdge MX740C, PowerEdge MX750C, PowerEdge MX840C, and PowerEdge R660.15
Converged infrastructure with Advanced NPAR eased network management in our tests
The challenges inherent in datacenter networking require state-of-the-art solutions to streamline administrative tasks. The Dell PowerEdge MX solution with Broadcom NICs leverages virtual networking technology to tackle these problems head on. By employing a new Advanced NPAR feature that presents multiple network cards to the OS, administrators can manage VLANs with ease while reducing network sprawl, improving network resource optimization, and more. In our testing, we verified that the Advanced NPAR feature works on the Dell PowerEdge MX solution, with easy management from within the Dell OME-M console. Using Advanced NPAR, administrators have two options for how to manage switches: via a traditional Full Switch mode that requires more manual intervention, or via SmartFabric mode, which simplifies administrator tasks by virtualizing and unifying switch configuration. Through Advanced NPAR and SmartFabric mode, the Dell PowerEdge MX and Broadcom solution offers a strong foundation for network design that can help administrators navigate the difficulty of managing multiple virtualized networks.
This project was commissioned by Dell Technologies.
July 2023
Principled Technologies is a registered trademark of Principled Technologies, Inc.
All other product names are the trademarks of their respective owners.
Principled Technologies disclaimer
Principled Technologies is a registered trademark of Principled Technologies, Inc. All other product names are the trademarks of their respective owners.
DISCLAIMER OF WARRANTIES; LIMITATION OF LIABILITY: Principled Technologies, Inc. has made reasonable efforts to ensure the accuracy and validity of its testing, however, Principled Technologies, Inc. specifically disclaims any warranty, expressed or implied, relating to the test results and analysis, their accuracy, completeness or quality, including any implied warranty of fitness for any particular purpose. All persons or entities relying on the results of any testing do so at their own risk, and agree that Principled Technologies, Inc., its employees and its subcontractors shall have no liability whatsoever from any claim of loss or damage on account of any alleged error or defect in any testing procedure or result.
In no event shall Principled Technologies, Inc. be liable for indirect, special, incidental, or consequential damages in connection with its testing, even if advised of the possibility of such damages. In no event shall Principled Technologies, Inc.’s liability, including for direct damages, exceed the amounts paid in connection with Principled Technologies, Inc.’s testing. Customer’s sole and exclusive remedies are as set forth herein.


 Twitter
 Facebook
 LinkedIn
 Email
Email